‘Tis the Season..!

‘Tis the season to be jolly, fa-la-la-la-laa-la-la-la-la!

Christmas is fast approaching and everyone is thinking of their holidays – lounging in the sun, eating merry puddings, drinking merry cocktails and just generally taking it easy and relaxing. if you’re in the Northern Hemisphere somewhere, you might be all wrapped up in a holiday scarf, drinking eggnog and enjoying various pumpkin-spiced-goodies. Aah – the holidays – enjoyed everywhere!

I think most people might have their Christmas trees and decorations up already, but if you’re a traditionalist the tree will only go up 12 days before Christmas (UK) or on Christmas Eve (Germany). The Americans start to ‘deck the halls’ straight after Thanksgiving, which is close to the beginning of December in any case… But honestly, some people have their homes all kitted out by the middle of November already and some even as early as the beginning of November!

Retail shops tend to put up their decorations earlier too and have their merchandise on the shelves from mid-October, which frankly, is just too early in my opinion. But then again, I suppose they only have a short period in which to sell all their Christmas merchandise.

There are no traces of Christmas in our house yet – apart from the delicious and boozy fruitcake I baked on Tuesday. Perhaps some mince pies and eggnog next week?
{This fruitcake might not make it all the way to Christmas, let alone get a cap full of brandy every week – it’s just too delicious! I even had some for breakfast this morning..!}

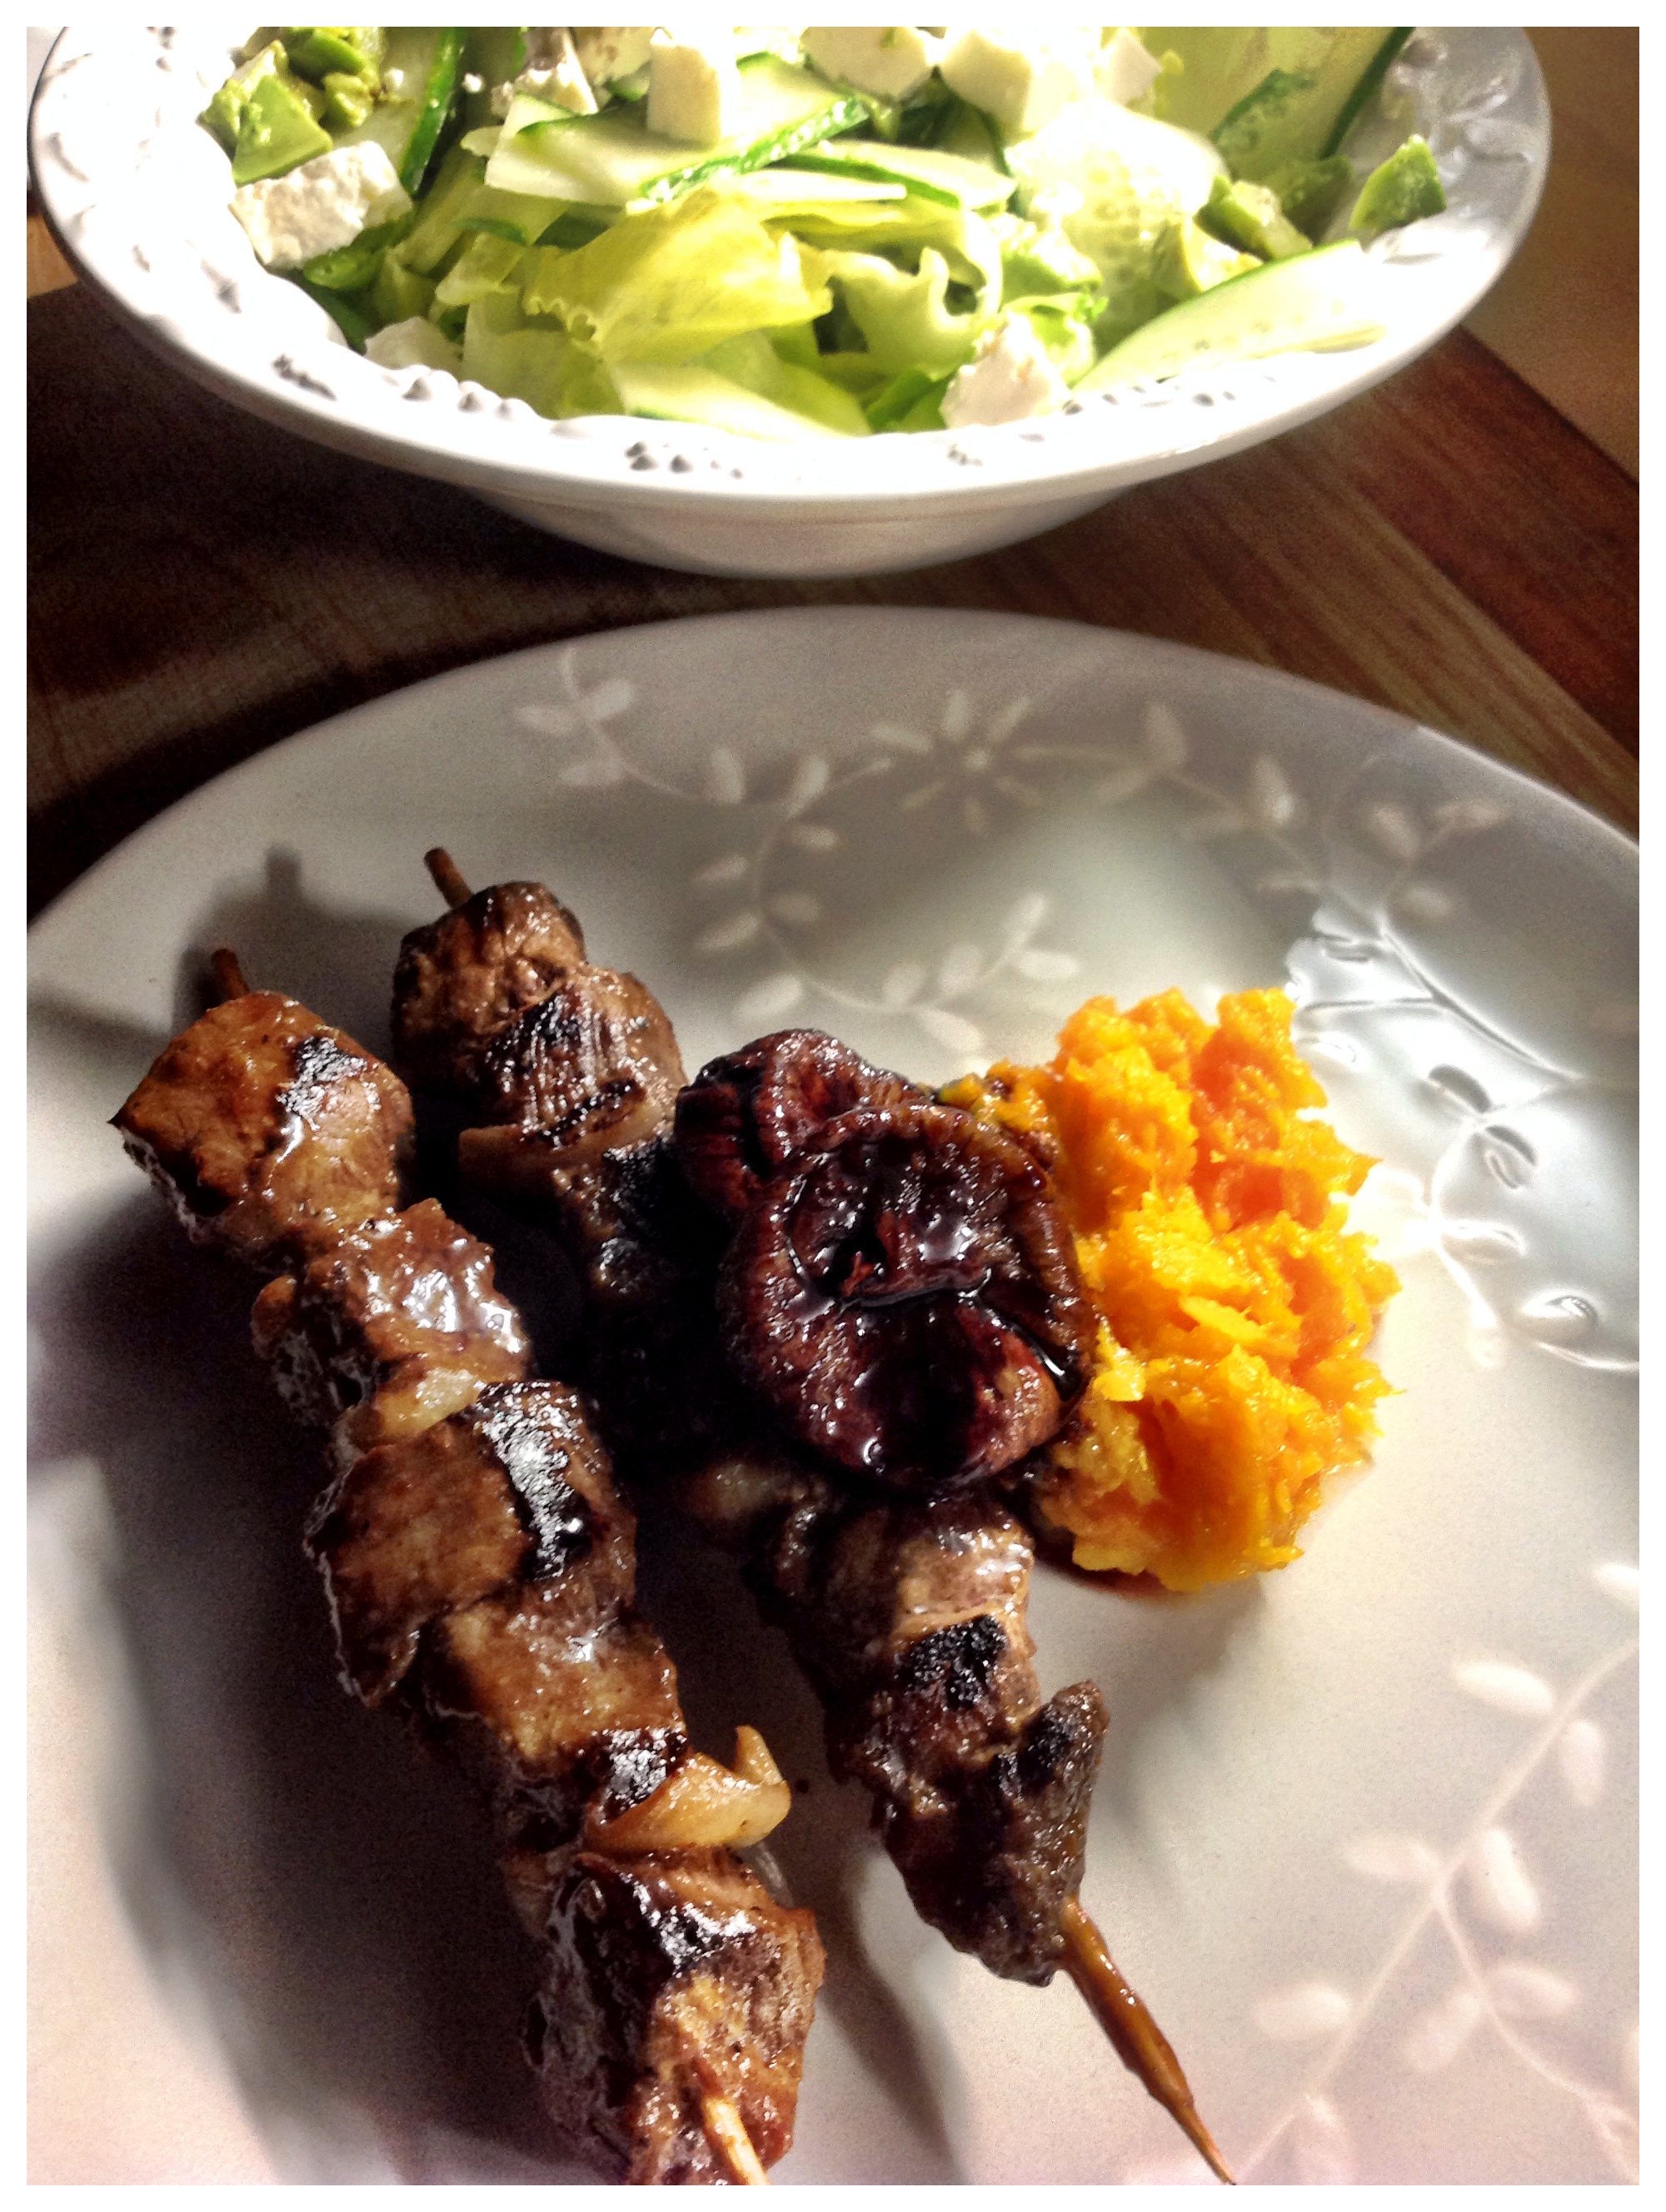
In the spirit of the ‘jolly season’, I made venison kebabs with figs in a Port reduction:

Venison kebabs & Port figs Venison kebabs & Port figs


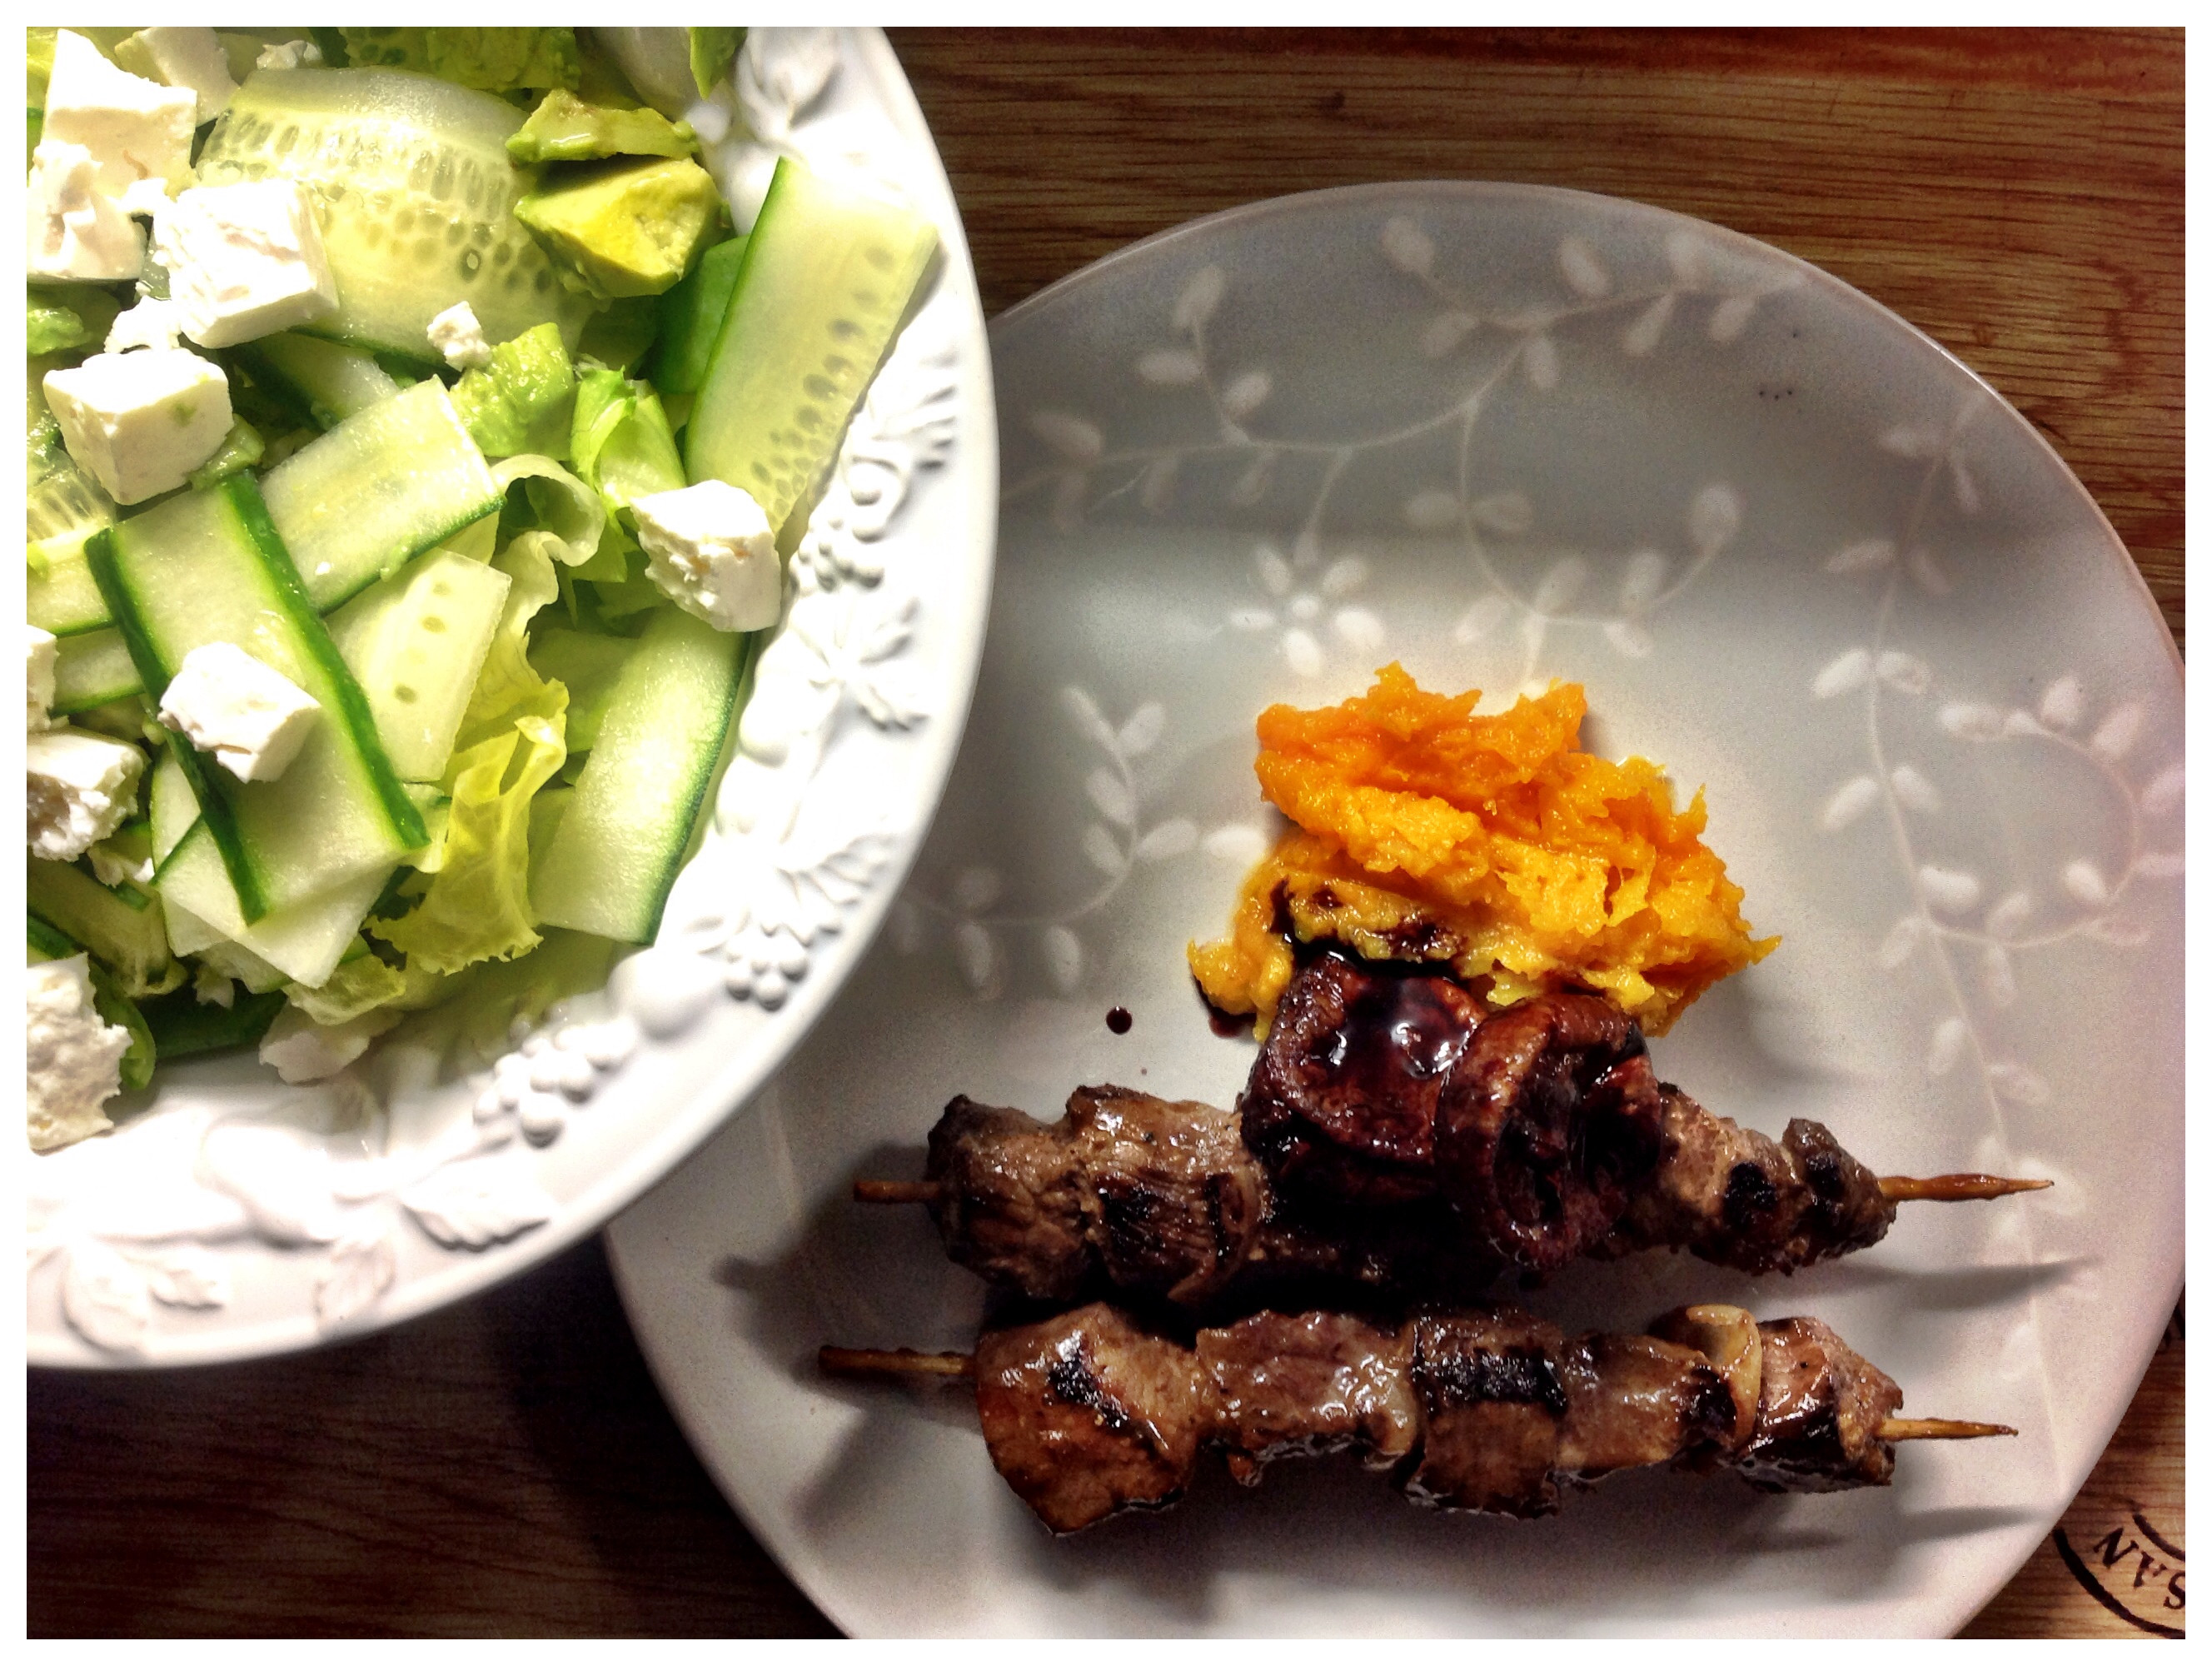
I used venison kebabs that we had made for us – marinated in Woolies’ BBQ marinade. Of course, you can make your own marinade too! You could also use any meat for your kebabs…

For the figs, you will need:

Turkish figs, dried

Port {Cape Ruby}

Castor sugar

Water

Cover the figs in Port in a small sauce pan and bring to the boil.  Add a tbs or 2 of sugar and a splash of water and let it simmer until it has reduced to a rich, syrupy sauce and the figs are soft.

Serve with buttery butternut mash {I added a dollop of butter and a bit of water to the raw butternut and let it steam in the microwave} and a green salad {lettuce, mangetout, cucumber, avocado and feta cheese}.

Delicious – enjoy! x

Pumpkin Cheesecake Swirl Ice Cream

After those delicious little winning pumpkin cupcakes, I decided to turn them into ice cream. {Currently obsessed with ice cream, remember??}

I found an amazing-looking recipe for red velvet ice cream {which I plan on making next} that I adapted for this pumpkin cheesecake swirl ice cream.

The result – a creamy and rich pumpkin cheesecake ice cream with a cake swirl running through it – AB FAB!

Pumpkin swirl ice cream


You will need:

1/4 cup sugar

1 cup cream

1 1/2 cup full cream milk

2 eggs

1 tsp vanilla

3 pumpkin cheesecake cupcakes {with frosting – see my recipe for these cupcakes}

1 tsp yellow food colouring gel

Beat the sugar and eggs together until they are light and frothy, for about 5 minutes. Add the milk and cream and mix.

Add the vanilla, the colouring and 2 of the cupcakes. Mix well and freeze.

I froze it for 4 and a half hours, removing it every hour to whisk. After repeating this 4 times, add the last cupcake, stir and transfer to a suitable container for freezing until you’re ready to enjoy! x

Crispy Grilled Chicken Livers with Seasonal Veggies

I do love chicken livers, but hate cooking them! The way they pop and splatter everywhere… My dad taught me a nifty little trick; putting a weight on top of the livers while they fry will prevent them from popping and also make them nice and crisp. Using a lid will just make them boil… So gross!

Tonight’s dish consists of 5 components – wilted spinach, buttery grilled sweet potatoes, grilled aubergines, tomato relish and crispy grilled chicken livers. This is such a great dish – perfectly filling, bursting with flavour, yet light and delicate. {This would make a perfect meal-in-a-jar too!}

Crispy Grilled Chicken Lives

Wilted Spinach:

Roughly chop 2 handfuls of spinach and sauté in butter. Add a sprinkle of nutmeg.

Sweet Potatoes:

Peel and thinly slice 3 sweet potatoes. Place in a baking dish, add a few dollops of butter and a sprinkle with a bit of nutmeg. Bake at 180C for about 45minutes.

Grilled Aubergines:

Slice one aubergine into 1/2cm slices, brush with olive oil and grill in a hot pan until golden and cooked.

Tomato Relish:

Slice one small onion and sauté in olive oil. Add 2tsp tomato paste and let it caramelise. Add a handful of small Roma tomatoes, cut in half. Flash fry for a few minutes, but don’t let it cook until mushy.

Crispy Grilled Chicken Livers:

I used 500g of chicken livers. Heat about 100g of butter and a splash of olive oil in a non-stick pan along with 2 red chillies and a clove of garlic, chopped. Add livers, season with salt and place a heavy pot on top. Fry until you can hear the livers starting to pop, then turn them over. Fry until both sides are crisp and brown. You might need to do them in two batches.

Assemble and enjoy! X


Pumpkin Season in the Vissers household…

Yes – it’s pumpkin season! Well, in the US in any case, but also here at our house in the Southern Hemisphere. {And seeing as half my family lives in the States, I think it’s quite appropriate that we have our own little pumpkin season to celebrate Halloween and Thanksgiving.}

The Jack-o-lanterns from Halloween have not suffered in vain – no, they have been up-cycled into baby food, Moroccan meatloaf {yesterday} and scrummy cheesecake-stuffed cupcakes {today}.  But don’t fear – there will be plenty more pumpkin dishes popping up over the next few days, as I have a LOT of pumpkin purée!

I found a really yummy recipe for pumpkin cupcakes on Pinterest at:

http://www.silvanaskitchen.com/gluten-free-cheesecake-filled-pumpkin-cupcakes/

{Mine are not gluten-free; if you’re going to have a cupcake, have it properly with all the gluten in tact! Unless of course you are gluten-intolerant and the only way to have your treat is to substitute with a GF option…}

Anyways – drifting off topic again – here is the recipe:

For the cream cheese mixture:

1 tub of cream cheese {230g at room temperature}

1/2 a cup of icing sugar

1 egg white

1/2 a tsp of vanilla

Whisk the cream cheese and sugar and add the egg white. Whisk until fluffy and add the vanilla. Whisk some more until everything is mixed.

For the pumpkin batter:

1 1/2 cups of flour {normal, gluten-free, whatever you prefer}

2 tsp pumpkin pie spice {use equal parts cinnamon, mixed spice and nutmeg}

1 1/2 tsp baking powder

1/2 tsp salt

1 cup of puréed pumpkin

2 eggs

1 cup of sugar

1/2 a cup of melted butter

1 tsp vanilla

Mix all the dry ingredients together and set aside. In a large bowl, mix together the pumpkin, egg, sugar, butter and vanilla. Add the dry ingredients and mix well.

Preheat the oven to 180C and line a muffin pan with 12 cupcake cases.

Fill the cases: one spoonful pumpkin batter, one spoonful cheesecake mix, another spoonful pumpkin batter. The cases should be almost full, but not quite to the top.

Bake for 25 minutes until cooked. A toothpick will come out clean.

For the frosting:

1 cup yellow sugar {or brown, but the yellow adds some nice colour.}

4 egg whites

1/4 tsp salt

230g butter {chilled and cubed}

1/2 tsp vanilla essence

Mix the egg whites, sugar and salt and whisk over a pot of simmering water until the sugar has melted. Remove from the water and continue to whisk at high speed until it reaches room temperature.

Add the butter, one cube at a time while whisking, until the mixture is thick and fluffy. Beat in the vanilla.

Transfer to a piping bag with a large round nozzle and pipe large swirls onto the cooled cupcakes.

{I think I will bake these a lot just to get that ‘American’ smell wafting through the house! It’s just the best smell and so typically ‘American Holiday’, it will always fill me with nostalgia.}

A must-bake – enjoy!

Halloween lanterns Cheesecake pumpkin cupcakes Cheesecake pumpkin cupcakes

Moroccan-inspired meatloaf with a Mediterranean salad

Tonight I made a meatloaf {I know, I know..! But seriously, it can be yum.} with Moroccan-inspired flavours, along with a Mediterranean salad of green beans, roasted red peppers, cherry tomatoes and capers.

As it’s Wednesday and we had running club right in the middle of dinner prep time, I needed to make something in advance that can just be heated up later. It also needed to be something that doesn’t take up a lot of prep time, because I was busy baking some seriously delicious cupcakes {will post recipe and pics tomorrow!} and I’m also trying to cut down on multi-tasking…

http://www.zaparents.com/2013/10/30/multi-tasking-bad-for-moms/

Right, so here’s my recipe for Moroccan-inspired meatloaf with a Mediterranean salad:

For the meatloaf, you will need:

500g mince {I used venison}

1 egg

1 cup of puréed pumpkin

1tsp each of peppadew spice, salt and cumin

2 red chillies, finely chopped

1 large clove of garlic, finely chopped

Mix all together and place in a greased loaf pan and bake at 180C for an hour until cooked through. The meatloaf is quite juicy because of the pumpkin, so you won’t get that brick-like texture!

For the salad, you will need:

4 small red peppers

green beans {about a handful}

cherry tomatoes

capers

olive oil

freshly ground sea salt

red wine vinegar

Roast the peppers by placing under the oven’s grill for 30 minutes, rotating as it blackens. When blackened all around, place in a glass bowl and cover with cling wrap. Let it cool.

Boil beans in salty water until just tender, blanch with cold water. Let it cool.

Once the peppers have cooled, peel off the charred skin and remove the seeds. Tear into strips and toss with the beans. Add cherry tomatoes, leaving some whole and chopping a few. Add the capers, drizzle with olive oil and the vinegar and finish off with a sprinkle of ground sea salt.

Enjoy!

{I would serve the meatloaf with a dried peach and prune compote, but I honestly forgot to make it! Oops..}

Moroccan-inspired meatloaf Mediterranean Red Pepper Salad

Nectarine {custard} Ice Cream

Another successful ice cream – this time a custard-based nectarine one.  The flavour-possibilities are just endless and I have so many ideas for yummy new flavours! Perhaps I need to get that ice cream maker soon…

I decided to make a nectarine ice cream, well, because I had lots of nectarines and didn’t want them to go bad – but also, it’s such a great and refreshing summer taste!

For the custard base, you will need:

4 large egg yolks

3/4 cup sugar

2 cups full cream milk

Whisk together the egg yolks and the sugar. In a small saucepan, heat the milk, but don’t let it boil – you should be able to stick your finger in it without burning. Next, slowly add the warm milk to the egg mixture while whisking. When all the milk has been added to the eggs, transfer the mixture back to the saucepan and whisk over medium heat. Don’t let it boil; just continue to whisk until it has thickened and can coat the back of a spoon.

For the nectarine part, you will need:

6 ripe nectarines, stones removed

1 cup of cream

1 tsp vanilla essence

Blitz the nectarines into a pulp with a food processor or blender. Add the vanilla essence and the cream and blend until you have a smooth and creamy mixture.

Strain the cooled custard through a sieve and add to the creamy nectarine slush. Refrigerate for an hour or so and then transfer to freezer {in a large plastic container with a lid}. I did the whole 40min, whisk, 40min, whisk thing again. Basically, you keep the ice cream mixture in the freezer for 40minutes, take it out and whisk. Freeze again for 40minutes, take it out and whisk. Freeze once more for 40minutes, whisk and then it can stay in the freezer.

Yummylicious – enjoy! X

Nectarine ice cream Nectarine ice cream

Roast Veg Terrine

My latest obsession – terrines – and here’s another one, a roast vegetable terrine.

I love that they’re quite easy to make and that they can be made in advance. I made this one on Wednesday morning for Wednesday evening {it takes about 8hrs to set} but then we never had it then… We joined a running club {I know – shock, horror! I call myself ‘The Reluctant Runner’ but I actually do enjoy it, just need to run more often, hence the joining of the club} and had a run on Wednesday evening which ended up in drinks afterwards, etc.

Right, so the terrine was eventually enjoyed tonight, along with grilled fish {snoek} and rocket leaves from our very own veg garden.

For the terrine:

6 assorted bell peppers, roasted {place in oven under the grill for about 40minutes, rotating as they char. Once charred all around, place in a large bowl and cover with clingwrap until cooled. Peel off the charred skin and remove the stalk and seeds.}

1 head of garlic, roasted {drizzle garlic with olive oil and bake at 200C for 40minutes}

6 zucchinis, thinly sliced and grilled until just tender

basil leaves

1/2 a cup of fresh tomato juice

1/2 a cup of chardonnay

salt & pepper to season

1 tbs + 1 tsp gelatine powder

Line a loaf tin with clingwrap and ensure that there is some extra hanging over the sides of the tin and set aside.

Bring the tomato juice to the boil, season with salt & pepper. In a heatproof bowl, sprinkle the gelatine over the Chardonnay and then melt this over the steam from the tomato juice. Once the gelatine and wine has melted, add to the tomato juice and remove from heat. Do not let this boil any further. Squeeze the roasted garlic from their cloves and blitz into the tomato mixture.  Let it cool before starting to assemble the terrine.

Start by dipping the basil leaves into the tomato & gelatine mixture and laying them in the bottom of the pan. Next, dip half of the roasted peppers into the juice and gently place them on top of the basil leaves. Dip the roasted and sliced zucchini in the mixture and layer all of it onto the peppers. Place another layer of basil leaves on top of that and finally, do a last layer of peppers. Pour the remaining gelatine mixture over all the layers, wrap the clingwrap tightly and place a weight on top. Refrigerate for at least 8 hrs.

Serve on a bed of rocket leaves as part of a main meal, or on a crostini as a snack.

Enjoy! X

Roast veg terrine Roast veg terrine Roast veg terrine

Pineapple Roast Chicken & Papaya Salad

Some people are totally against using fruit in salads or any other main dishes… Not me! I love it! You can do so much – use it in salads, with meats and chicken. It does depend on the fruit, but I do think it really complements meat dishes, just take apples & pork as an example. I’ve been quite inspired by pineapples lately and made a {totally delicious, if I may say so myself..!} pineapple & thyme roast chicken. You will need: 1 whole chicken 1 medium pineapple {peeled & core removed, blitzed in blender} 5 sprigs of thyme freshly ground sea salt & black pepper olive oil Rub the chicken with olive oil and season with salt & pepper. Remove the leaves from 2 of the sprigs of thyme and add to the pineapple. Pour the pineapple slush over the chicken and let it marinade for about an hour before roasting. Pre-heat oven to 180C. Place the remaining 3 thyme sprigs on top of the chicken and roast for an hour until golden and cooked. For the papaya salad: Fresh papaya cubes Fresh basil leaves Grilled plain Halloumi cheese, cubed Sweet corn kernels Chorizo sausages, sliced & grilled Mix together and serve with the pineapple roast chicken. {The natural juice from the papaya is all you need in terms of a dressing!} A perfect Summers dinner – just simple, tasty and fresh! Enjoy! X Papaya & Halloumi salad Pineapple & thyme roast chicken

Summer Lamb Roast

Ah – the Sunday roast… Surely a tradition in most homes?

With meat-galore and starchy side dishes until the cows come home… To me, the traditional Sunday Roast lunch is more suited to Winter – a kind of comfort meal.

So what to do when it’s Summer or Spring and you feel like making a roast? Well, just skip the heavy side dishes and focus on light and bright salads and veg.

My perfect Summer Roast Lamb:

Roast lamb with a herby rub {sea salt, rosemary, garlic, mustard, black pepper, paprika, brown sugar, lemon zest, nutmeg and bay leaf}

Steamed asparagus with garlic, butter and sea salt

Minty green salad {granny smith apples, mint leaves & cucumber}

Mint dressing for both salad & lamb {fresh mint, whole coriander seeds, apple cider vinegar & honey}

What you need to do:

Rub a leg of lamb (I used 1.3kg leg) with olive oil and your rub mixture an hour or more before cooking for all the flavours to absorb into the meat as much as possible. You can make your own rub with the above ingredients, or buy a ready-made version. I used the Lamb Rub from Woolies – simply divine.

Place the lamb in an oven dish (no lid) and cook for 2 1/2 to 3 hrs at 180C – in an oven, Weber or Big Green Egg. I used the Egg of course! {We actually cooked the lamb directly on the grill and used a drip tray underneath, so you get a nice golden crust on all sides of the meat!}

For your salad, cut an apple and cucumber into thin slices and add a handful of roughly chopped mint. {Each person can add their own dressing}

For the asparagus, break off the woody end bit off the stems and steam or boil with a tbs of butter and chopped garlic clove until just cooked. They should still be crunchy – please, no  and limp asparagus!

For the dressing:

Grind a handful of mint leaves and a tsp of coriander seeds in a mortar & pestle until you have a course paste. Add a splash of apple cider vinegar and a tbs of honey. Mix well and keep in a little jug for serving.

Keep an eye on the lamb and don’t let it dry out. It should be moist and juicy and just the teensiest bit pink.

Serve with a Chardonnay and enjoy! X

Summer Lamb Roast

Summer Lamb Roast